# 02-使用Spring特性优雅书写业务代码
# 一、前言
大家在日常业务开发工作中相信多多少少遇到过下面这样的几个场景:
- 当某一个特定事件或动作发生以后,需要执行很多联动动作,如果串行去执行的话太耗时,如果引入消息中间件的话又太重了;
- 想要针对不同的传参执行不同的策略,也就是我们常说的策略模式,但10个人可能有10种不同的写法,夹杂在一起总感觉不那么优雅;
- 自己的系统想要调用其他系统提供的能力,但其他系统总是偶尔给你一点“小惊喜”,可能因网络问题报超时异常或被调用的某一台分布式应用机器突然宕机,我们想要优雅无侵入式地引入重试机制。
其实上面提到的几个典型业务开发场景Spring都为我们提供了很好的特性支持,我们只需要引入Spring相关依赖就可以方便快速的在业务代码当中使用啦,而不用引入过多的三方依赖包或自己重复造轮子。下面我们就来看看Spring提供的强大魔力吧。
# 二、使用Spring优雅实现观察者模式
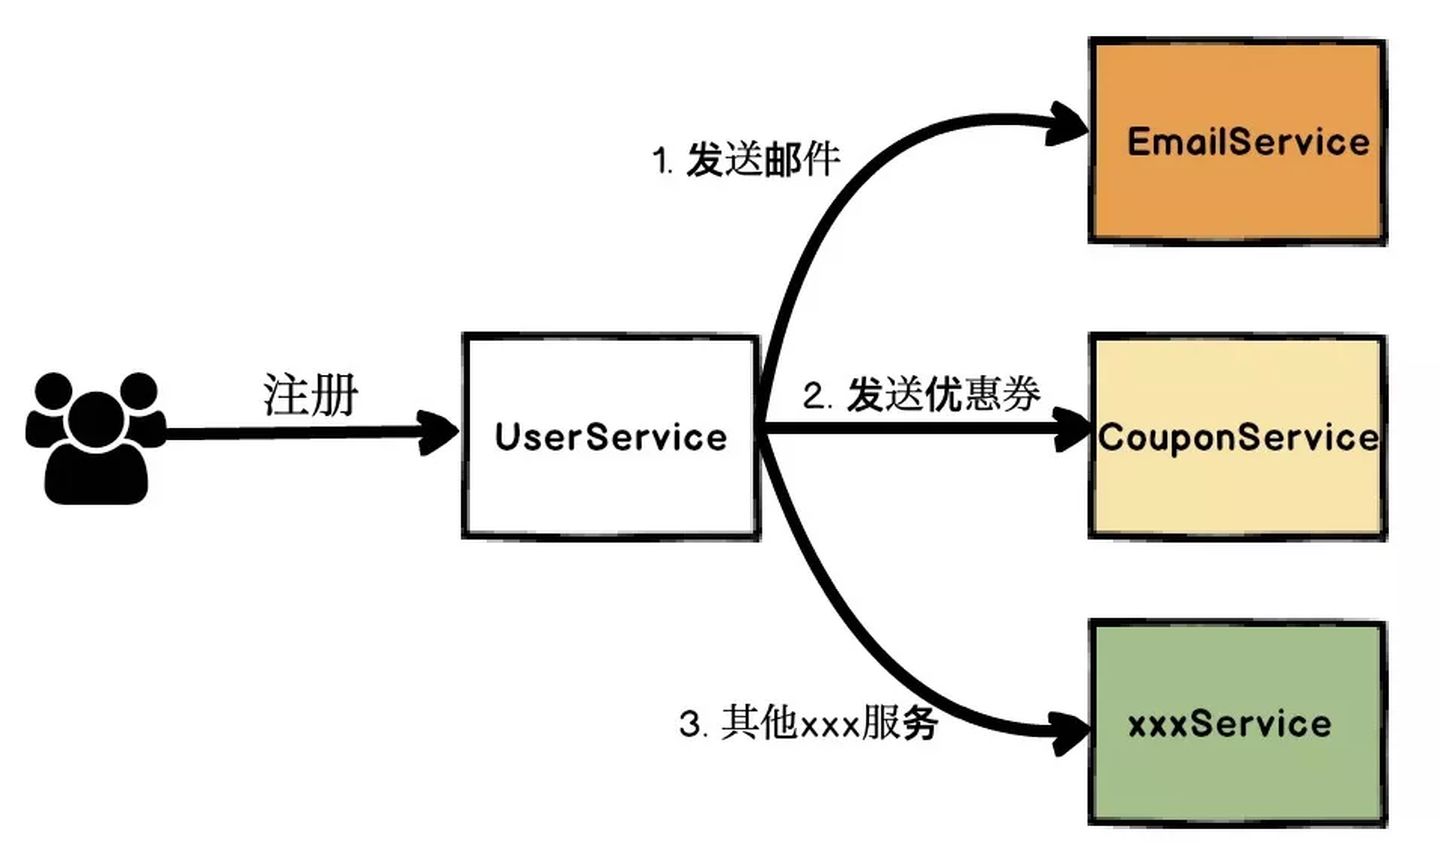
观察者模式定义对象间的一种一对多的依赖关系,当一个对象的状态发生改变时,所有依赖于它的对象都得到通知并被自动更新,其主要解决一个对象状态改变给其他关联对象通知的问题,保证易用和低耦合。一个典型的应用场景是:当用户注册以后,需要给用户发送邮件,发送优惠券等操作,如下图所示。
使用观察者模式后:
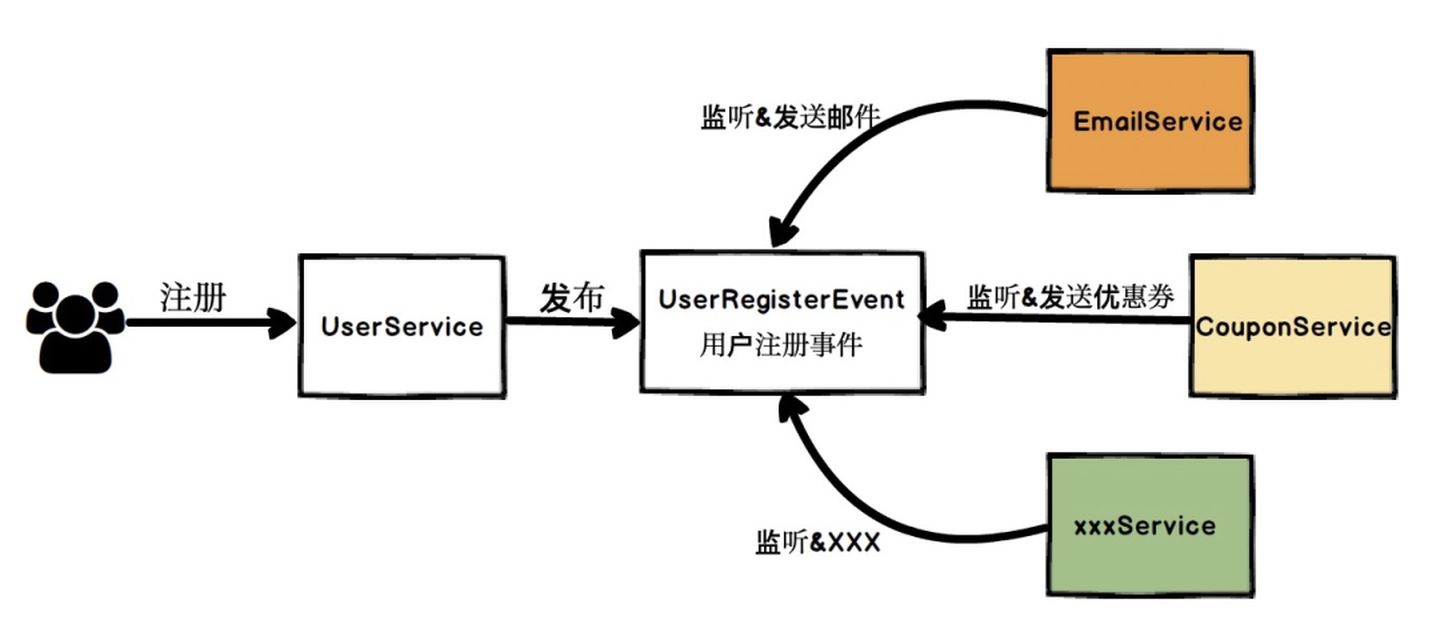
UserService 在完成自身的用户注册逻辑之后,仅仅只需要发布一个 UserRegisterEvent 事件,而无需关注其它拓展逻辑。其它 Service 可以自己订阅 UserRegisterEvent 事件,实现自定义的拓展逻辑。Spring的事件机制主要由3个部分组成。
- **ApplicationEvent:**通过继承它,实现自定义事件。另外,通过它的 source 属性可以获取事件源,timestamp 属性可以获得发生时间。
- **ApplicationEventPublisher:**通过实现它,来发布变更事件。
- **ApplicationEventListener:**通过实现它,来监听指定类型事件并响应动作。这里就以上面的用户注册为例,来看看代码示例。首先定义用户注册事件 UserRegisterEvent。
public class UserRegisterEvent extends ApplicationEvent {
    /**
     * 用户名
     */
    private String username;

    public UserRegisterEvent(Object source) {
        super(source);
    }

    public UserRegisterEvent(Object source, String username) {
        super(source);
        this.username = username;
    }

    public String getUsername() {
        return username;
    }
}
然后定义用户注册服务类,实现 ApplicationEventPublisherAware 接口,从而将 ApplicationEventPublisher 注入进来。从下面代码可以看到,在执行完注册逻辑后,调用了 ApplicationEventPublisher的 publishEvent(ApplicationEvent event) 方法,发布了 UserRegisterEvent 事件。
@Service
public class UserService implements ApplicationEventPublisherAware {
    // <1>
    private Logger logger = LoggerFactory.getLogger(getClass());

    private ApplicationEventPublisher applicationEventPublisher;

    @Override
    public void setApplicationEventPublisher(ApplicationEventPublisher applicationEventPublisher) {
        this.applicationEventPublisher = applicationEventPublisher;
    }
    public void register(String username) {
        // ... 执行注册逻辑
        logger.info("[register][执行用户({}) 的注册逻辑]", username);
        // <2> ... 发布
        applicationEventPublisher.publishEvent(new UserRegisterEvent(this, username));
    }
}
创建邮箱Service,实现 ApplicationListener 接口,通过 E 泛型设置感兴趣的事件,实现 onApplicationEvent(E event) 方法,针对监听的 UserRegisterEvent 事件,进行自定义处理。
@Service
public class EmailService implements ApplicationListener<UserRegisterEvent> { // <1>
    private Logger logger = LoggerFactory.getLogger(getClass());
    @Override
    @Async// <3>
    public void onApplicationEvent(UserRegisterEvent event) { // <2>
        logger.info("[onApplicationEvent][给用户({}) 发送邮件]", event.getUsername());
    }
}
创建优惠券Service,不同于上面的实现 ApplicationListener 接口方式,在方法上,添加 @EventListener 注解,并设置监听的事件为 UserRegisterEvent。这是另一种使用方式。
@Service
public class CouponService {
    private Logger logger = LoggerFactory.getLogger(getClass());
    // <1>
    @EventListener
    public void addCoupon(UserRegisterEvent event) {
        logger.info("[addCoupon][给用户({}) 发放优惠劵]", event.getUsername());
    }
}
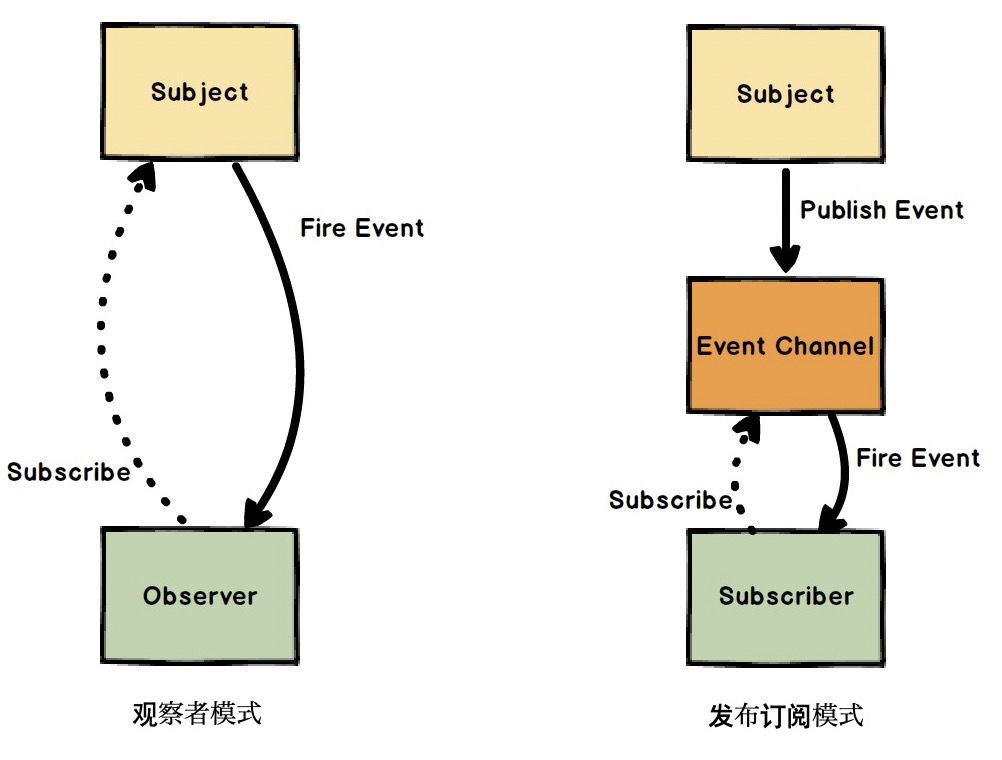
看到这里,细心的同学可能想到了发布订阅模式,其实观察者模式于发布订阅还是有区别的,简单来说,发布订阅模式属于广义上的观察者模式,在观察者模式的 Subject 和 Observer 的基础上,引入 Event Channel 这个中介,进一步解耦。图示如下,可以看出,观察者模式更加轻量,通常用于单机,而发布订阅模式相对而言更重一些,通常用于分布式环境下的消息通知场景
# 三、使用Spring Retry优雅引入重试机制
如今,Spring Retry是一个独立的包了(早期是Spring Batch的一部分),下面是使用Spring Retry框架进行重试的几个重要步骤。第一步:加入Spring Retry依赖包
<dependency>
    <groupId>org.springframework.retry</groupId>
    <artifactId>spring-retry</artifactId>
    <version>1.1.2.RELEASE</version>
</dependency>
第二步:在应用中包含main()方法的类或者在包含@Configuration的类上加上@EnableRetry注解 第三步:在想要进行重试的方法(可能发生异常)上加上@Retryable注解
@Retryable(maxAttempts=5,backoff = @Backoff(delay = 3000))
public void retrySomething() throws Exception{
    logger.info("printSomething{} is called");
    thrownew SQLException();
}
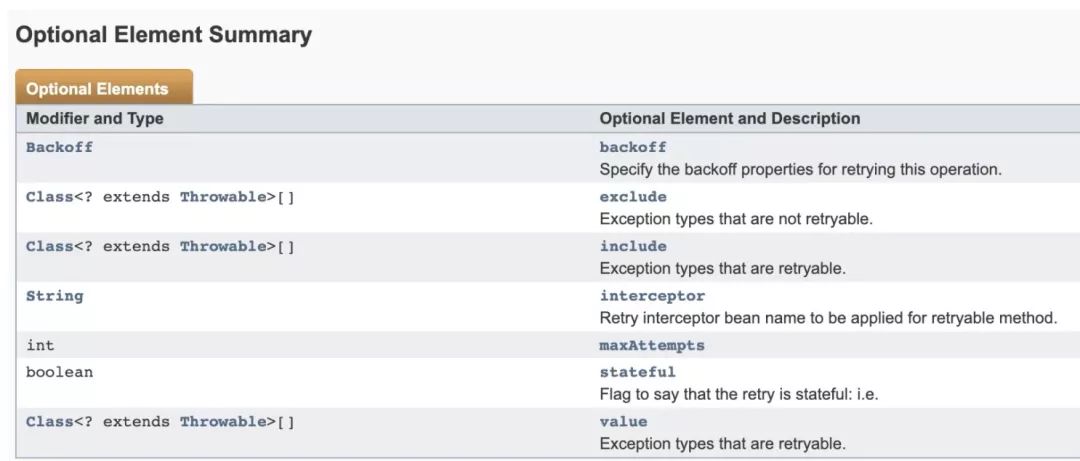
在上面这个案例当中的重试策略就是重试5次,每次延时3秒。详细的使用文档看这里,它的主要配置参数有下面这样几个。其中exclude、include、maxAttempts、value几个属性很容易理解,比较看不懂的是backoff属性,它也是个注解,包含delay、maxDelay、multiplier、random四个属性。
- **delay:**如果不设置的话默认是1秒
- **maxDelay:**最大重试等待时间
- **multiplier:**用于计算下一个延迟时间的乘数(大于0生效)
- **random:**随机重试等待时间(一般不用)
Spring Retry的优点很明显,第一,属于Spring大生态,使用起来不会太生硬;第二,只需要在需要重试的方法上加上注解并配置重试策略属性就好,不需要太多侵入代码。
但同时也存在两个主要不足:
- 第一,由于Spring Retry用到了Aspect增强,所以就会有使用Aspect不可避免的坑——方法内部调用,如果被 @Retryable 注解的方法的调用方和被调用方处于同一个类中,那么重试将会失效;
- 第二,Spring的重试机制只支持对异常进行捕获,而无法对返回值进行校验判断重试。如果想要更灵活的重试策略可以考虑使用Guava Retry,也是一个不错的选择。
# 四、优雅使用Spring特性完成业务策略模式
策略模式相信大家都应该比较熟悉,它定义了一系列的算法,并将每一个算法封装起来,使每个算法可以相互替代,使算法本身和使用算法的客户端分割开来,相互独立。
其适用的场景是这样的:一个大功能,它有许多不同类型的实现(策略类),具体根据客户端来决定采用哪一个策略类。比如下单优惠策略、物流对接策略等,应用场景还是非常多的。
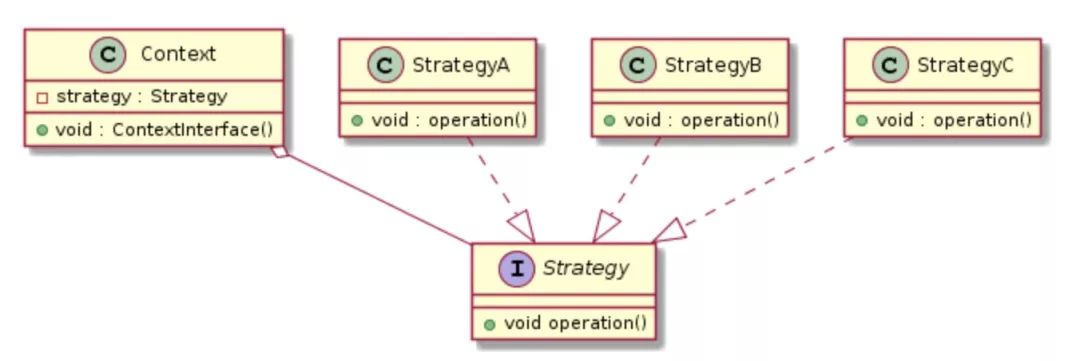
举一个简单的例子,业务背景是这样的:平台需要根据不同的业务进行鉴权,每个业务的鉴权逻辑不一样,都有自己的一套独立的判断逻辑,因此需要根据传入的 bizType 进行鉴权操作,首先我们定义一个权限校验处理器接口如下。
/**
 * 业务权限校验处理器
 */
public interface PermissionCheckHandler {
    /**
     * 判断是否是自己能够处理的权限校验类型
     */
    boolean isMatched(BizType bizType);
    /**
     * 权限校验逻辑
     */
    PermissionCheckResultDTO permissionCheck(Long userId, String bizCode);
}

//业务1的鉴权逻辑我们假设是这样的:
/**
 * 冷启动权限校验处理器
 */
@Component
public class ColdStartPermissionCheckHandlerImpl implements PermissionCheckHandler {
    @Override
    public boolean isMatched(BizType bizType) {
        return BizType.COLD_START.equals(bizType);
    }
    @Override
    public PermissionCheckResultDTO permissionCheck(Long userId, String bizCode) {
        //业务特有鉴权逻辑
    }
}
//业务2的鉴权逻辑我们假设是这样的:
/**
 * 趋势业务权限校验处理器
 */
@Component
public class TrendPermissionCheckHandlerImpl implements PermissionCheckHandler {
    @Override
    public boolean isMatched(BizType bizType) {
        return BizType.TREND.equals(bizType);
    }
    @Override
    public PermissionCheckResultDTO permissionCheck(Long userId, String bizCode){
        //业务特有鉴权逻辑
    }
}
可能还有很多其他的业务鉴权逻辑,这里就不一一列举了,实现逻辑像上面这样组织就好了。接着就到了关键的地方了,上面我们定义了这么多策略,应该怎么优雅的组织起来呢,这就需要用到Spring提供的一些扩展特性了,Spring主要为我们提供了三类扩展点,分别对应不同Bean生命周期阶段:
- Aware接口
- BeanPostProcessor
- InitializingBean 和 init-method
我们这里用到的主要是 Aware 接口和 InitializingBean 两个扩展点,其主要用法如下代码所示,关键点就在于实现 ApplicationContextAware 接口的 setApplicationContext 方法和 InitializingBean 接口的 afterPropertiesSet 方法。
实现 ApplicationContextAware 接口的目的就是要拿到 Spring 容器的资源,从而方便的使用它提供的 getBeansOfType 方法(该方法返回的是 map 类型,key 对应 beanName, value 对应 bean);而实现 InitializingBean 接口的目的则是方便为 Service 类的 handlers 属性执行定制初始化逻辑。
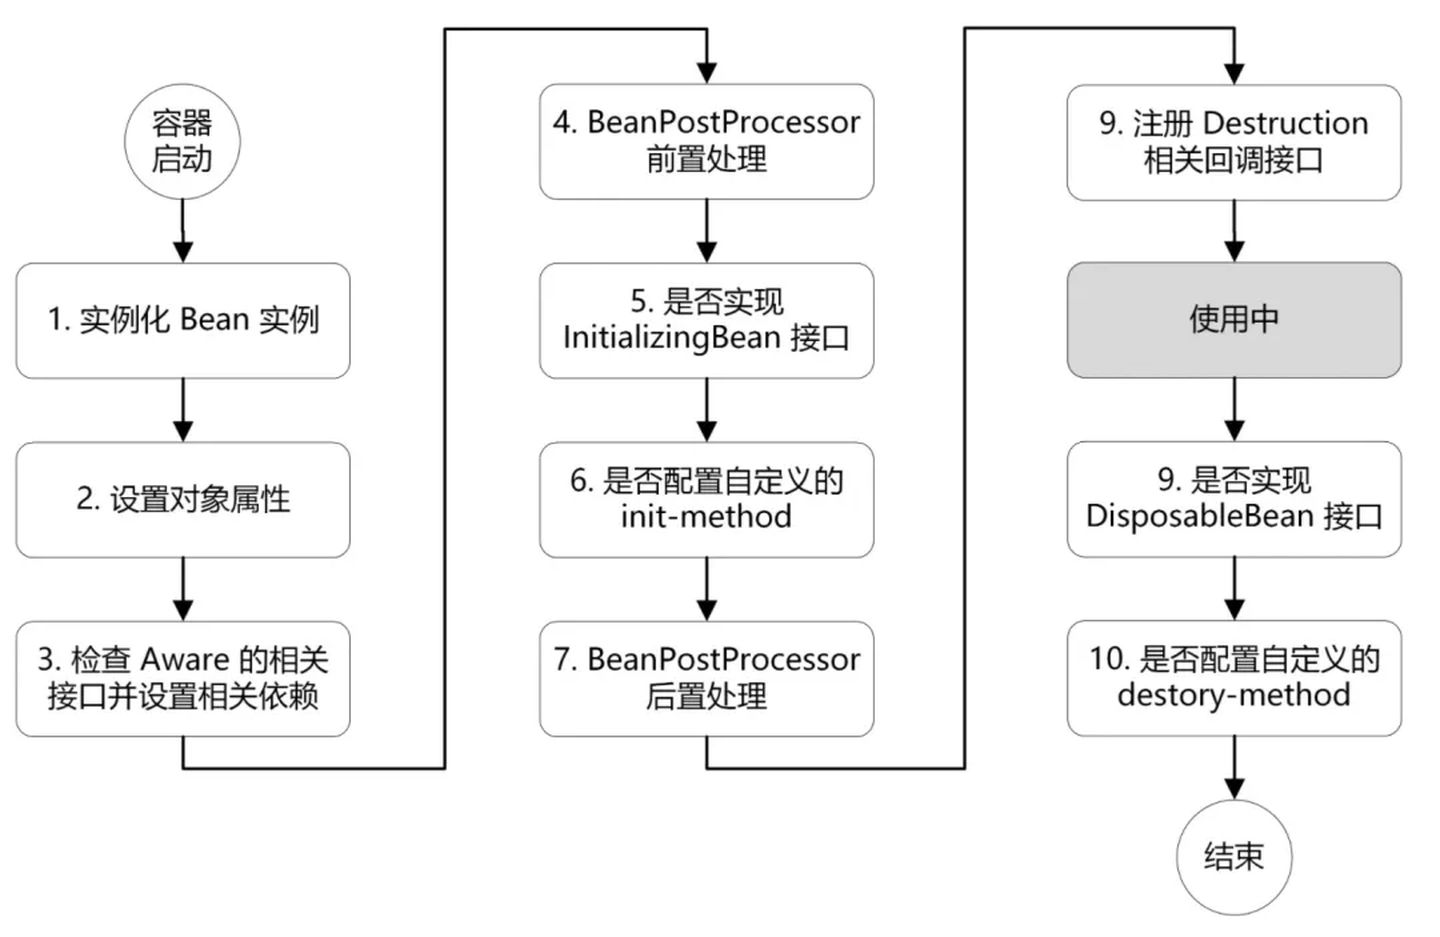
可以很明显的看出,如果以后还有一些其他的业务需要制定相应的鉴权逻辑,我们只需要编写对应的策略类就好了,无需再破坏当前 Service 类的逻辑,很好的保证了开闭原则。
/**
 * 权限校验服务类
 */
@Slf4j
@Service
publicclass PermissionServiceImpl implements PermissionService,
										ApplicationContextAware,InitializingBean {
    private ApplicationContext applicationContext;
    //注:这里可以使用Map,偷个懒
    private List<PermissionCheckHandler> handlers = new ArrayList<>();

    @Override
    public PermissionCheckResultDTO permissionCheck(ArtemisSellerBizType artemisSellerBizType, Long userId, String bizCode) {
        //省略一些前置逻辑
        PermissionCheckHandler handler = getHandler(artemisSellerBizType);
        return handler.permissionCheck(userId, bizCode);
    }

    private PermissionCheckHandler getHandler(ArtemisSellerBizType artemisSellerBizType) {
        for (PermissionCheckHandler handler : handlers) {
            if (handler.isMatched(artemisSellerBizType)) {
                return handler;
            }
        }
        returnnull;
    }

    @Override
    public void afterPropertiesSet() throws Exception {
        for (PermissionCheckHandler handler : applicationContext.getBeansOfType(PermissionCheckHandler.class)
            .values()) {
            handlers.add(handler);
            log.warn("load permission check handler [{}]", handler.getClass().getName());
        }
    }
    @Override
    public void setApplicationContext(ApplicationContext applicationContext) throws BeansException {
        this.applicationContext = applicationContext;
    }
}
当然在这里相信不少同学会有疑问,那就是这里在获取 handler 处理器 bean 的时候,所有的 bean 是不是已经初始化好了?会不会存在有的 handler 还没有初始化好的情况?
答案是不会的,Spring Bean 的声明周期保证了这一点(当然前提是 handler 自身不会有特殊的初始化逻辑)。经过实际验证,所有的 handler 会在 Service 初始化操作前 ready,感兴趣的同学可以编写代码验证,可以先在相应钩子处打上日志直接输出结果验证,然后在 Spring 源码关键处打上断点 debug,相信会有不少收获。